本章节也是个人梳理
spring入门第六节——AOP
一、什么是AOP AOP是一种将功能拆分成多个独立模块的框架,去除任意一个模块不影响原程序以及别的模块的运行,可以有效的降低耦合度,举个例子就是由多个小块拼接而成的机器人,去除其中一个小块,不会整体和其它独立零件造成影响。
二、AOP的类型 (1)有接口的情况:通过proxy对接口的实现类进行动态代理
(2)没接口的情况:通过CGlib对类进行继承后,对子类实现动态代理
三、什么是动态代理 创建一个代理对象,代理对象拥有类的所有功能和增强的部分,由代理对象替代原来的对象参与到程序中,用游戏解释的话类似于仿生泪滴或者外置装甲之类的,让仿生泪滴或者装了外置装甲的另一个我去执行任务。
四、AOP的底层原理(有接口的情况)(实操的时候不需要看底层,方法都被封装好了,但是为了能够更好体会技术的惊喜感和方便开发,还是要掌握底层技术) 由AOP中proxy的newproxyInstance()方法实现,newproxyInstance()有三个参数,第一个是类的加载器,第二个是接口(可以有多个接口),第三个是Invokehandler接口(实现接口后第三个改为Invokehandler的实现类),这个接口定义了原方法和增强部分,不过需要编写者自己实现。
4.1 Invokehandler的实现类 (1)创建一个新的类继承Invokehandler()类,通过有参构造器获得获取对象,并用Object泛型储存
(2)实现Invokehandler的原生方法,该方法有三个参数,第一个是代理对象(Proxy),第二个是对象使用的方法(Method),第三个是使用的方法的参数(String[] arg)
(3)在Invokehandler的原生方法内编写增强部分的代码
(4)在Invokehandler的原生方法内利用Method类的自带的invoke(Object,arg)调用原方法(此处Object是有参构造器获取的对象,arg是参数)
(5)return返回值。
4.2 代码: 1 2 3 4 5 6 7 8 9 10 11 12 13 14 15 16 17 18 19 20 21 22 23 24 25 26 27 28 29 30 31 32 33 34 35 36 37 38 package spring5test; import spring5test.Dao.UserDao; import spring5test.Dao.UserDaoImpl; import java.lang.reflect.InvocationHandler; import java.lang.reflect.Method; import java.lang.reflect.Proxy; import java.util.Arrays; public class demo { public static void main(String args[]){ Class[] inter = {UserDao.class}; UserDaoImpl test = new UserDaoImpl(); UserDao dao = (UserDao) Proxy.newProxyInstance(demo.class.getClassLoader(),inter,new handler(test)); System.out.println("查看代理对象是否成功:"+dao.add(1,2)+dao.update("T头人")); } } class handler implements InvocationHandler{ Object obj; public handler(Object obj) { this.obj = obj; } @Override public Object invoke(Object proxy, Method method, Object[] args) throws Throwable { System.out.println("执行之前的方法名:"+method.getName()+",参数:"+ Arrays.toString(args)); Object res = method.invoke(obj,args); System.out.println("执行之后查看对象地址:"+obj); return res; } }
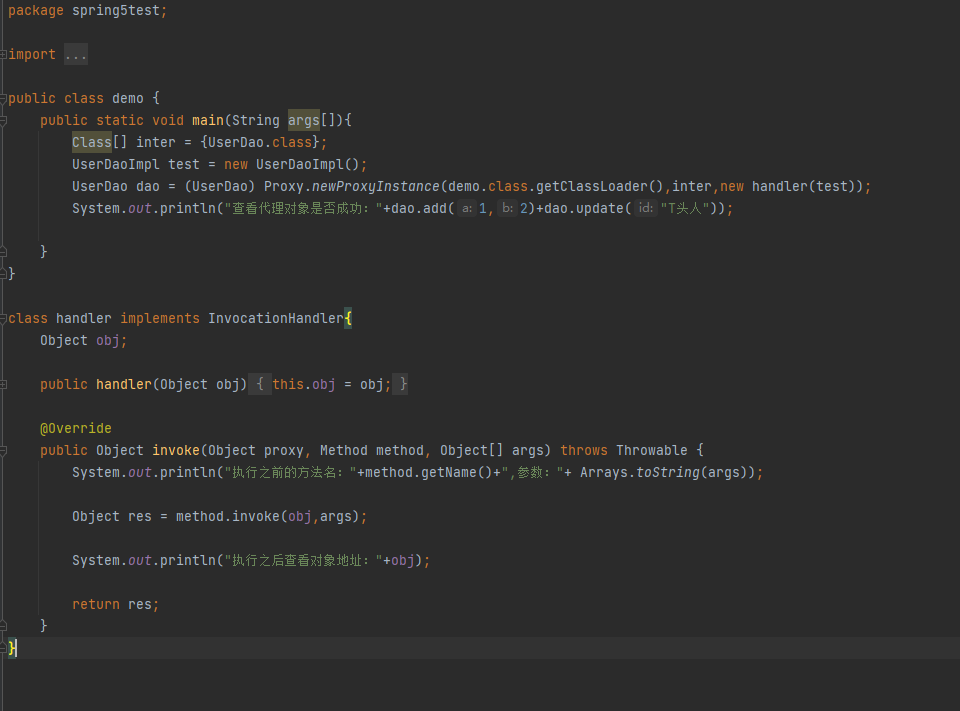
截图:
4.3 代码解释: (1)UserDao dao = (UserDao) Proxy.newProxyInstance(demo.class.getClassLoader(),inter,new handler(test)); 创建了UserDao类的代理对象,所以右侧代码要用(UserDao)进行一个类型强转。
Proxy.newProxyInstance(demo.class.getClassLoader(),inter,new handler(test))
三个参数依次为类的加载器,接口,Invokehandler接口的实现类。
(2)public Object invoke(Object proxy, Method method, Object[] args) throws Throwable 实现Invokehandler接口的方法,三个参数依次为代理对象,方法,方法的参数。
(3)Object res = method.invoke(obj,args); 用method类型自带的invoke方法执行原程序,两个参数分别是对象和方法的参数,将结果存储在Object泛用类中。
五、AOP操作术语 (1)连接点:可以被增强的方法。
(2)切入点:实际被增强的方法。
(3)通知(增强):对方法的功能的增加,有五种类型
前置增强Before
后置增强AfterReturning(在return返回值之后执行增强)
环绕增强Around(前置后置都有增强)
异常增强AfterThrowing(抛出异常的时候才会触发的增强)
最终增强After(类似于Java的final,无论结果如何,只要程序执行到最后就会执行的增强)
(4)切面:将增强导入切入点的过程。
六、AOP准备工作: Spring本身的框架并不优秀,所以需要导入AspectJ的jar包,用AspectJ的框架和Spring共用,通常情况Spring都是要和AspectJ共同使用的。
导入AOP,AspectJ,以及另外三个Spring的AOP的jar包。
七、注解方式使用AOP框架 前面说到,Spring的IOC容器有两个大步骤,创建对象和注入属性,AOP框架也可以分为两大步,创建对象和增强方法。
(1)创建对象: 在xml文件中定义context名称空间,打开Component扫描,通过@Component注解封装Bean类。
1 context:component-scan base-package="spring5test"></context:component-scan>
(2)增强: 在xml文件中定义aop名称空间,打开aop自动代理,检测并使用所有@Aspect注解
1 <aop:aspectj-autoproxy></aop:aspectj-autoproxy>
(3)通过切入点表达式找到需要被增强的类 切入点表达式:execution([限定修饰符][返回值类型][类的路径][方法] (参数列表)))
限定修饰符:public,private这些东西,常用*表示
返回值类型
类的路径:从src目录开始查找路径
方法
参数列表:用..表示所有参数
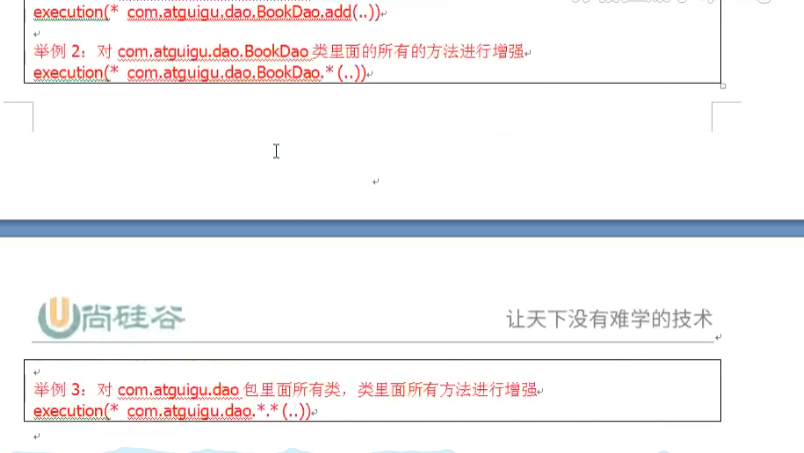
举例:
1 execution(* spring5test.User.User.Amethod(..))
对spring5text.User.User类中的所有方法进行增强
execution(* spring5test.User.User.*(..))
对spring5text.User类中所有类中的的所有方法进行增强
(4)代码 1 2 3 4 5 6 7 8 9 10 11 12 13 14 15 16 17 18 19 20 21 22 23 24 25 26 27 28 29 30 31 32 33 34 35 36 37 38 39 package spring5test.User; import org.aspectj.lang.ProceedingJoinPoint; import org.aspectj.lang.annotation.*; import org.springframework.stereotype.Component; @Component @Aspect public class Userproxy { @Pointcut(value = "execution(* spring5test.User.User.Amethod(..))") public void conf(){} @Before(value = "conf()") public void before(){ System.out.println("before..."); } @After(value = "conf()") public void after(){ System.out.println("after..."); } @AfterReturning(value = "conf()") public void afterReturn(){ System.out.println("afterreturn..."); } @AfterThrowing(value = "conf()") public void afterthrow(){ System.out.println("afterthrow..."); } @Around(value = "conf()") public void around(ProceedingJoinPoint a) throws Throwable{ System.out.println("环绕之前"); a.proceed(); System.out.println("环绕之后"); } }
(5)提取公共路径 使用@Pointcut注解
@Pointcut(value = “execution(* spring5test.User.User.Amethod(..))”)
之后的注解都可以替换成类
八、全配置文件形式 1 2 3 4 5 6 7 8 9 10 11 12 13 14 15 16 17 18 <?xml version="1.0" encoding="UTF-8"?> <beans xmlns="http://www.springframework.org/schema/beans" xmlns:xsi="http://www.w3.org/2001/XMLSchema-instance" xmlns:context="http://www.springframework.org/schema/context" xmlns:aop="http://www.springframework.org/schema/aop" xsi:schemaLocation="http://www.springframework.org/schema/beans http://www.springframework.org/schema/beans/spring-beans.xsd http://www.springframework.org/schema/context http://www.springframework.org/schema/context/spring-context.xsd http://www.springframework.org/schema/aop http://www.springframework.org/schema/aop/spring-aop.xsd"> <bean id="1" class="spring5test.User.User"></bean> <bean id="2" class="spring5test.User.Userproxy"></bean> <aop:config> <aop:pointcut id="p" expression="execution(* spring5test.User.User.Amethod(..))"/> <aop:aspect> <aop:before method="before" pointcut-ref="p"></aop:before> </aop:aspect> </aop:config> </beans>
九、全注解形式 1 2 3 4 5 6 7 8 9 10 11 package spring5test; import org.springframework.context.annotation.ComponentScan; import org.springframework.context.annotation.Configuration; import org.springframework.context.annotation.EnableAspectJAutoProxy; @Configuration @ComponentScan(basePackages = {"spring5test"}) @EnableAspectJAutoProxy() public class conf { }